We live in a very visually oriented world, and to thrive in this world we need to adapt, especially when the success of our business or career depends on an online presence. Whether you run a business or are a stay-at-home mom/dad with a lifestyle blog, you need to create professional photos for your website and social media! That’s just how it goes. Today, I will try to give you my simple recipe for how to do it.

In 2014, according to Mary Meeker’s annual Internet Trends report, people uploaded an average of 1.8 billion digital images every single day. Reading this article, which has more recent data, I was blown away by the number of videos and photos being uploaded to social media (like 100 million photos and videos being uploaded to Instagram, DAILY!).
This is insane! Don’t you think?
With that being said, I can assure you that more than half of that content being uploaded daily is garbage. Yes, we live in a very visual world, but also we live in a “snapping” culture. Most of the pictures shared by people are far from looking professional.
Everybody can snap a picture these days, but not everybody can create a visual poem.
If creating engaging visual content for your social media and website is very important to you, and it should be, it also should be very important to learn basic photography rules. It doesn’t matter what camera you use. The rules are always the same. Yes, rules are meant to be broken. But you can’t break them if you don’t know what they are.
In this article, I’m going to talk about all the things you should think about before you push the “snap” button. If you use the 7 ingredients for professionally looking images every single time you pull out your camera, you will see a tremendous improvement in your photographs.
Photography is like cooking
When I make a new recipe I try to follow it closely, however when I get comfortable with it and I know it by heart I start experimenting. I add new things, substitute one ingredient for another, etc.
The list below is pretty much in order of how you should approach the image creating process (in my opinion, of course). I’m comparing it to cooking because I do like to cook myself, and learning photography and its principles remind me of the process of learning how to navigate the culinary world.
If you’re not into cooking that’s ok, you can probably find similarities of this process to something else you have struggled with at first but then you learned the basics, you became more comfortable with it, and all of the sudden an entirely new world opened up for you… whether it was woodworking, sewing, crocheting, or even training a dog.
Everybody can buy a cake mix, add some water to it, throw it in the oven and call it a b-day cake made from scratch. However, not everybody can create a cake the way Cake Boss does it.
To make a dish that’s high up in ranks everything must be in perfect harmony. The ingredients, the process, and the person who makes it should be like two dancers on a dance floor. There’s almost an intimate relationship between the chef who makes it, all the ingredients he uses to make it, and the process.
Try to be more like Cake Boss and less of a person who buys a cake mix.
Don’t get me wrong, going with the cake mix isn’t bad. I’m not saying people who do that suck at baking and “it’s just awful, and, oh gosh, don’t do it ever again!” Sometimes it’s ok to go with the cake mix. Sometimes it saves us time and energy and it’s all we have available. Or we use it because that suits us just right, and who the heck cares, anyway.
But isn’t it more fulfilling when you make something from scratch, and when you can say: “I made it!”? When in addition to that your creation tastes and looks awesome?
My recipe for creating professional photos for your website and social media:
-
Start with a VISION for your photograph –
I know you probably think: “what?!? Vision for what? I just need to know how to take a nice-looking picture”. Well, yes and no. You do need to know how to navigate the environment as well as the equipment you work with to be able to take a nice-looking picture. However, that itself is not going to stop people from scrolling past your image.
Your picture should be your visual voice, and you will not find that voice in buying the newest cameras and camera gadgets.
When you get new shoes you have a vision of how you’re going to wear them. Right? You see something at the store, a new blouse, a new jacket, a new anything, and you’re already thinking about how it is going to look with something else you have in your closet. You have a vision.
When you stand in your kitchen, thinking about a cake you want to bake or a dinner you want to feed to your family tonight you don’t just throw random stuff on a pan and think: “Oh God, I hope that tastes good, and I won’t poison anybody”.
Well, let’s be honest, that happened to me a few times. However, I’m quite comfortable in the kitchen, and even without the recipe, I know what I’m doing. On those days when I cook like a maniac witch cooking up a new brew, nobody dies or gets food poisoning. (lucky me)
Knowing what you want means that you have a vision. You plan for a certain outcome.
Only a handful of great things have been discovered or were made by an accident… Yes, happy accidents happen in art. Being in the right place in the right moment, and all that jazz. Like the picture, I took during this past Halloween. You’ll see what I’m talking about later in this post. Pure accident. When the action was happening, in that split of a second I SAW the outcome of the picture in my head and I was able to pull it off. I had a vision.
ONE THING YOU CAN START DOING RIGHT AWAY TO PRACTICE WORKING AROUND YOUR VISION:
Before you take any picture, ask yourself,
– “WHY do I want to take it?”
– “HOW can I make it so it says something meaningful?”I’m not saying that every single picture you take in your life must be a philosophical statement. But for gosh sake, stop, breath in, and breath out before you snap that picture. Think! of why this thing in front of you is so important that it needs to be photographed.
-
Assess the available LIGHT
What makes a picture look professional in the first place? Well, LIGHT and how the person who takes the picture uses it. So, if I had to give you only one piece of advice today it would be: LEARN HOW TO USE LIGHT in photography. This is one of the most frustrating things for people who don’t have any photography background. But when you get it, it’s the most rewarding one.
Just like with the vision. I can tell you that you need one, but it’s up to you if you practice enough to start understanding it, “seeing the opportunity” in the environment around you. Creativity is like a muscle. I can be your coach, but the training itself needs to be done by you and your body if you want to see the results.
Same with photography and understanding the principles of it. You need to get out and practice. And today’s world couldn’t make it any easier. With smartphones constantly being glued to our hands the opportunities to practice principles of photography ARE EVERYWHERE! So, the only way to grasp the concept of light is to go out and shoot in all the light available. Don’t listen to all these smart people telling you the best light is soft filtered light.
The best light is the one that’s used with a vision.
Go out and take pictures when the sun is high up. Don’t just settle for photographing one thing. Practice taking pictures of people in full light and practice taking pictures of your garden in full light. See how the same light might work for one thing but won’t work for the other.
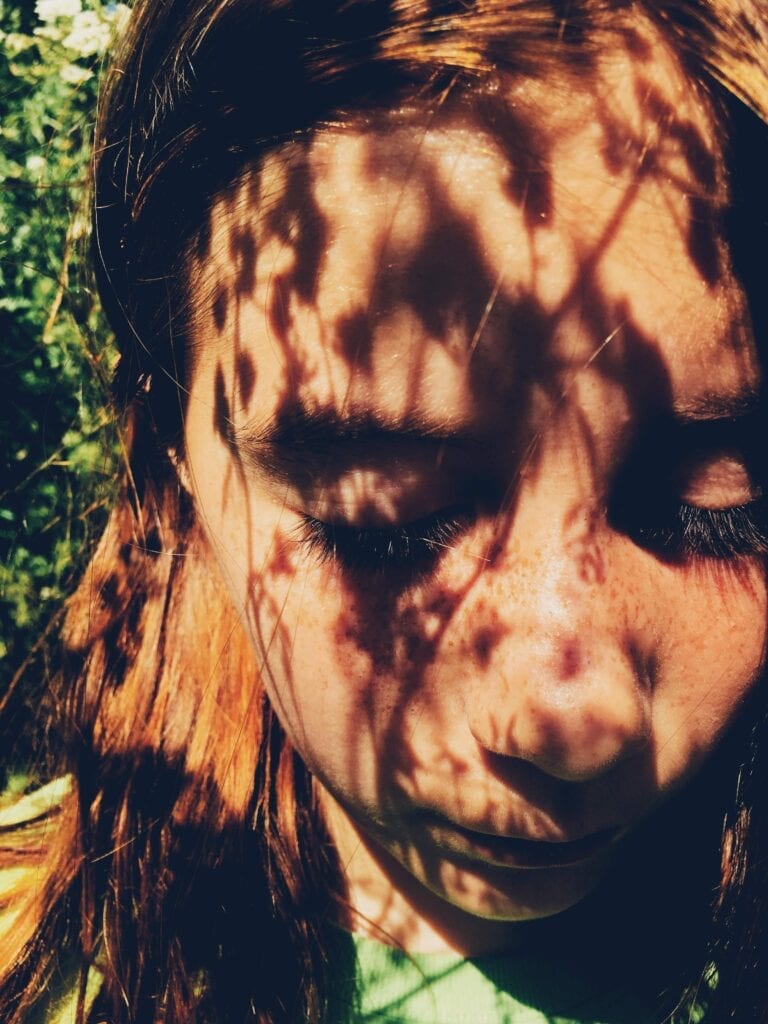
For example, harsh full light on your subject’s face might cause him/her to have dark shadows on his/her face. However, as I mentioned before, rules are meant to be broken. As much as the style of the picture below wouldn’t serve as a great headshot, it is a beautiful form of art. Artistic use of the available light. I want to invite you to play with it yourself.
For this picture below, this was my vision. I wanted all the shadows to fall on my daughter’s face. I wanted her to have her eyes closed. I wanted for the whole picture to look dreamy, yet dramatic.
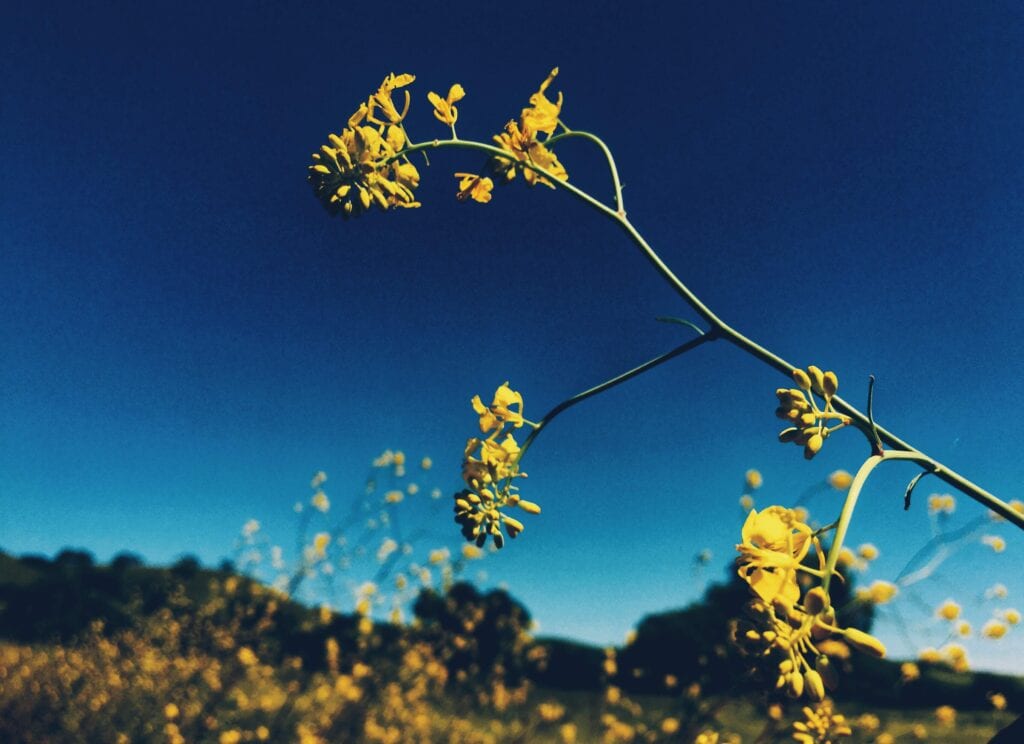
Taking a picture of a pretty flower in the full harsh sun will bring beautiful colors out and you will be able to capture textures perfectly. Go out, practice.
Taking pictures at night or even during the day but in a dark room with a little natural light, especially when using your smartphone, is very challenging. The little light available might cause a lot of frustration. Smartphones’ cameras don’t perform great in low light and most of your pictures might come out blurry and grainy. For me, it is not a thing to be complaining about. For me, it’s an invitation to get creative and I invite you to have the same attitude.
THING YOU CAN START DOING TO PRACTICE CREATING VISUALLY PLEASING IMAGES WHILE USING THE LIGHT CORRECTLY:
filtered natural light For professionally looking images for your social media, I’d recommend sticking with pictures taken in a shade. Place your subject in the full shade of natural soft light where the direct light won’t “touch them”. Whether it’s a product you’re selling or a lifestyle snap of your kids, or even a self-portrait. Your subject should be facing the light source. It will help you to create a nicely lit image with a minimum to zero shadows and without any bright light spots all over it.
Few things to keep in mind:
– KNOW THE DIFFERENCE OF HAZY MORNING AND LATE AFTERNOON LIGHT versus HARSH AND FULL OF SHADOWS MID-DAYLIGHT.
– TURN OFF YOUR FLASH, AND NEVER USE IT AGAIN,
– USE NATURAL LIGHT AS MUCH AS POSSIBLE (night photography could be an exception to that). When shooting indoors try to turn off all the lights in the room and use only natural light. Like in the example below.

The top picture has lights in the room ON. The bottom picture has ONLY NATURAL light present. -
Pick your BACKGROUND wisely
I always laugh when I see all the bathroom (or bedroom) selfies of gorgeous women with a toilet peeking somewhere in the background… You’ve probably seen them, too. So, before you hit that “snap” button, look at the screen of your camera and for a few seconds forget about the main subject. Whether the main thing you’re taking pictures of is you, or your kid, or your product, or a flower, instead of looking at that directly, look what’s around it. If you see things that distract you or take the attention from the main subject by being in the background try to adjust your angle. Try to move around your main subject or move your camera a little.
If I happen to shoot a session at a location that has random people or structures in the background, I try to position my clients or myself in a certain way so most of that distraction happening there is right behind my clients. In other words, I use my main subject to cover the unwanted parts of the background.
Another option would be to photoshop them out, of course, but you should learn how to work smarter not harder. -
Spice it up with ACTION / MOVEMENT
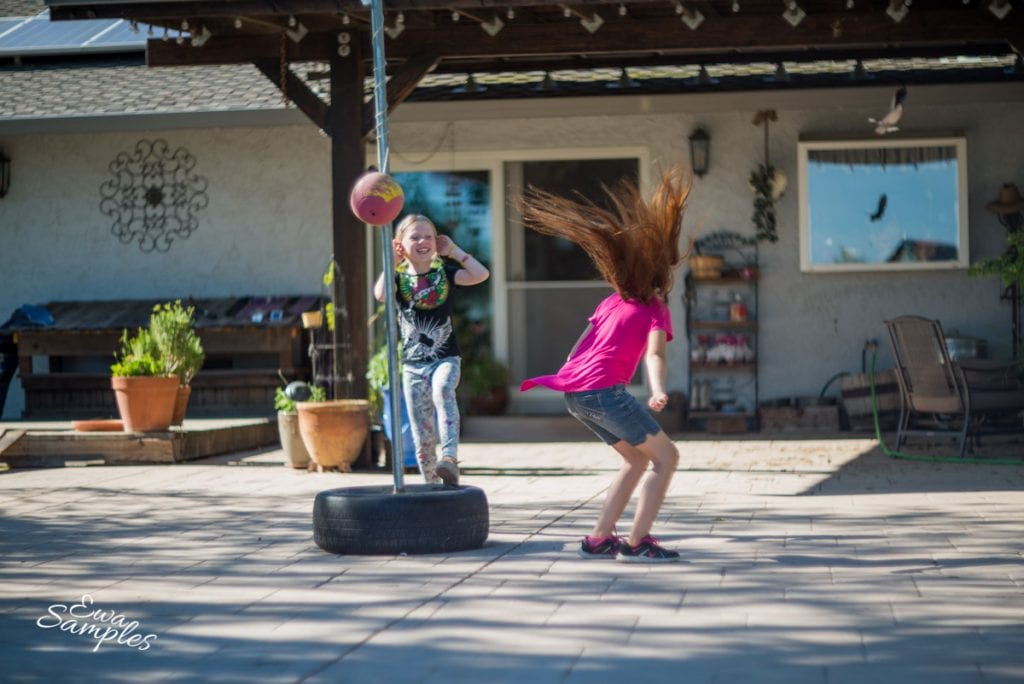
When I take pictures of living things I like to include movement. That always adds more life to the image as well as originality. That’s why in my opinion headshots are boring. VERY boring and if I can, and my client is up for it, I like to ask them to do certain tasks while I take pictures of them. I like to bring their personality that way.
Adding hand gestures or asking people to walk from one point to another is very helpful. When working with kids ask them to jump, dance, or twirl.You can add action to photographs of non-living things as well. Including hands is a great way to do that.

THINGS YOU CAN START DOING TO PRACTICE CREATING ACTION IN YOUR PHOTOGRAPHS:
– Ask your subject to move. It doesn’t have to be jumping or twirling but even shifting their weight from one leg to another can help, etc.
– Ask them to tilt their head from one side to the other. Ask them to look right or left or somewhere above your head, or somewhere down to the floor. Making your subject look somewhere out of the frame adds action to the image because the viewer might be thinking: “why is she looking there? there’s must be something going on outside of the frame”. It builds anticipation, curiosity, and excitement.
-
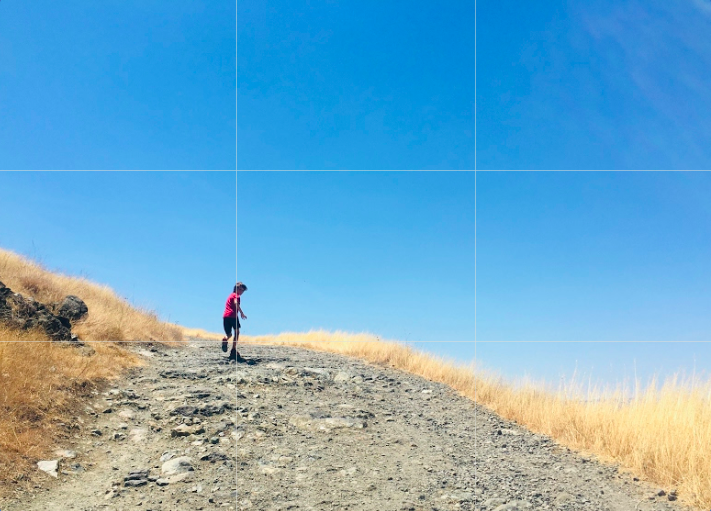
COMPOSE YOUR IMAGE LIKE YOU’D DO IF IT WAS A SONG or A POEM

One of the key ingredients in creating a delicious picture is composition. Composition in a photograph is the placement or arrangement of other visual elements, as separate from the subject of a photograph.
If you shoot using a phone there’s an option called grid that you always should have turned on. Turn it on and never turn it off. If you don’t know how to do it, just google “how to turn on the grid in (insert the name of your phone.” The lines that will appear on your screen while taking pictures divide your screen into 9 rectangles. That’s the grid. This is going to help you with practicing something called “the rule of thirds”. And the rule of thirds is important because it’s going to help you compose more visually appealing images.I like the word composed because you can relate it to a song. You don’t want to listen to somebody randomly hitting the piano notes. Do you? Unless it’s a 2-year-old, of course, and then we all clap with fake applause. But, if somebody sits down and starts playing a perfectly composed song we sometimes forget to breathe. It’s so beautiful.
Same with a beautifully composed picture. You don’t want to include a bunch of random pieces of everything in it. You want to match all the elements in your image to go well together like a perfectly composed visual song.
A perfectly composed image is like a nicely balanced dish. The ratios of all the ingredients used in it are just right!
ONE THING YOU CAN START DOING TO PRACTICE BETTER COMPOSITION WITH THE HELP OF GRID:
– before you take the picture, try to position your subject anywhere on the points where the lines meet. Right top corner. Right bottom corner. Left top corner. Left bottom corner. Smack in the middle.
Take a few pictures of the same subject but compose them differently. Then see if there’s one particular image, one particular corner that seems like “it makes sense” to have your subject there.
For those who are into The Queen’s Gambit here is an amazing post showing some great examples of the composition.
-
Take a variety of shots
Before you start taking your pictures you need to know where you’re going to be using them. Taking only one picture, and then trying to adjust it to look good on all your social media is almost impossible. It could cause your grey hair to grow 3 times faster, that’s for sure.
For example, the Instagram feed (the squares you see when you visit someone’s profile) has different requirements than Instagram stories (the short videos or pictures that disappear within 24 hours from posting). One is square while to other is more of a portrait format. Not to mention that if you try to use the same image in your website’s header or anywhere else you will have the same problems.
Also, if you try to create a FB ad or post from the same image you will run into a similar issue: things just won’t look right and you will have to spend a lot of time trying to make them look right.Remember to take several different images of the same thing. Some horizontal, some portrait. Some close-ups, and some from further away.
Think ahead to compose the picture with space for text, if you’ll be running an ad or using the images to create a visually pleasing post with quotes on them.
Keep all these things in mind, and I assure you that will save you a lot of time and headache. Plus with just one shoot you’ll end up with a lot of great images to distribute all over your social media for, maybe a week or maybe two (depending on how often you decide to post).
-
EDIT
I might disappoint you by saying that, probably, 99% of the pictures you see on social media that take your breath away and you wish you knew how to create them yourself, ARE HEAVILY EDITED. To be honest with you, I edit EVERY SINGLE IMAGE I post on social media. Even if it’s an image of my dog chasing a ball or a sandwich I had for lunch. It doesn’t matter if it’s a picture taken on my phone or a picture taken with my professional camera.
Editing an image is like adding spices to your dish. A little bit of salt. A little bit of pepper. A teaspoon of lime juice. What would a dish be without a good mix of spices?
The equipment used for creating beautiful images, no matter how good or professional has its limits. Pictures without edit often lack colors, contrast, and the WOW factor that you can easily add by tweaking your picture with free editing apps.
For example, the picture below was taken on Halloween night. It was a happy accident that I already had the phone in my hand because this moment happened fast.
We were getting out of an alley, there was light coming out of a storm drain and this red balloon tied to it. I saw my kids running towards it, and at the same time, there was a car driving towards us with its headlight on. The light from the car created a beautiful backlight and I just saw this moody picture in my head: Their silhouettes looking into the hole where Pennywise is hiding, in the darkness of a night. I quickly went down to my knees to adjust the angle, so the car wasn’t really visible in the picture. Remember the trick of blocking distractions from the background by using your subjects? Yeah… that’s what I used here. Snap!
After we got home, I opened the picture in one of my favorite apps, Snapseed, and did some basic edits to bring the dark mood out more.When I hear people saying: “oh wow, you have a great camera! I heard it takes amazing pictures”, and believe me, I hear it quite a lot, I just laugh. Yes, my camera took this picture:
but my creativity and my vision turned it into this:
We are getting close to the end of this post in which I’ve tried to fit almost 20 YEARS of my photography experience into three thousand words. I feel like I barely scratched the surface. However, I also feel like I gave you quite the foundations to start developing your visual language. When you go out there and start following those 7 simple rules I know you are going to be heading in the right direction. It will take time and effort. We don’t just learn a language. We don’t just pick up a brush and start painting masterpieces. We don’t just open a cookbook for the first time in life and all of the sudden a 5 star dinner is served for family and friends. We don’t get a dog and the next day he knows all the tricks possible.
Learning a new skill takes time. It takes even more time to learn something that’s absolutely outside of our comfort zone. If you’re a computer geek, activities that require your creative brain to be involved might cause you some anxiety and frustration.
That’s why sometimes you need to decide to outsource something that you don’t want to do or invest your time in learning. For example, I don’t do my bookkeeping. I just don’t. And I never will. That gives me the time and energy to focus on what I’m good at and enjoy the most.
So, whether you plan to learn photography because you want to start presenting more beautiful images of your life, services, or your business in general or whether you plan to outsource it. Being able to see our world in a different light is a wonderful skill to have. You can turn an ordinary walk into a silent meditation filled with appreciating nature and all that’s she’s made out of.
In meantime, grab my gift and impress your family, friends, and social media followers even more.
[mailmunch-form id=”324138″]And I can’t wait to see what you start creating.